Beefy Mexican Nacho Dip


Printable version
Another Super Bowl is upon us. The big game has become an unofficial holiday in America, bringing together millions to watch two teams compete for the championship of the NFL. The Super Bowl has something for everyone, if you’re not a fan of football then there’s the commercials and star-studded entertainment.

For me, not only is it the biggest game of the year, but it’s a day to showcase my best party snacks, which is also my favorite type of cuisine to cook and eat. What I love about this type of food is the variety of bites and flavors that can adorn one plate. A good Super Bowl spread should look like a parade of appetizers that will provide hours of snacking. This will create a good base for hours of drinking – or praying – after all, the game is always played on Sunday.

For this recipe, a huge helping of ground beef is smothered in nacho cheese, spices and sautéd vegetables. It’s then heated through in a slow cooker, creating a batch of beefy nacho dip big enough to feed a party.

BEHIND THIS BITE
I am really looking forward to Super Bowl XLVII. It’s the first year in a while that I’m not emotionally invested in the game in one way or the other.

I am a huge Colts, Peyton Manning and whoever is playing the Patriots and Steelers fan.

That said, I have had a real reason to root for one team or the other for the last decade. Some games have been euphoric, the Colts triumphant win in Super Bowl XLI and The Giants destruction of the Patriots perfect season the following year were two amazing highs. The night the Colts lost to the Saints in SB XLIV was a devastating low.

This year, there is no Tom Brady, Ben Rothlisburger or Peyton Manning to sway my fandom. I can set back and just hope for a great game. Will the Raven’s Ray Lewis go out on top or will the young Colin Kaepernick from the 49ers make a mark on the game for the new type of running QB that seems to be emerging around the league.

I hope it’s a game for the ages.

Eat well, cook often ...

THE RECIPE
Party Dip; 1 hour, 30 minutes
2 lb Ground beef
1 C Red onion, diced
1 C Jalapeño, chopped with flesh and seeds removed
2 Tbs Chili powder
1 Tbs Cumin
2 cans Nacho Cheese (15 oz each)
1 can Tomatoes, diced and drained (24 oz)
2 bags Tortilla chips

Prep ingredients
In a skillet over medium-high heat brown ground beef, 6 to 8 minutes. Salt and pepper to taste. Remove with slotted spoon and place in slow cooker. Discard all but 1 tablespoon of drippings. Sauté onion and jalapeño until soft 5 to 6 minutes. Salt and pepper to taste. Remove to slow cooker.

Combine, heat and serve
Add chili powder, cumin, cheese and tomatoes to slow cooker and combine with beef and vegetables. Cook on high until heated through and bubbly,
1 hour. Serve with tortilla chips.

Roasted Red Pepper and Artichoke Pizza


Printable version
I make a lot of gourmet pizzas. This time I wanted to get fancy. I don’t know why, but I guess my idea of “fancy” is roasted red peppers and artichokes. The two ingredients, with a little olive oil instead of sauce, is what I have conjured up.

And you know what?

It’s awesome!

This is one of the better pizzas I have eaten in a long time. It’s a must try for any pizza connoisseur. It also has the distinction of being vegetarian, something not very common with my recipes. My mom had been raving for months about a friend of hers that made a sun-dried tomato and artichoke pizza, so I thought I would go in that direction but I replace the tomato with the roasted red pepper.

Another touch with this pizza that makes a huge difference in taste is the oregano. As I sprinkled it over the pie I crushed it with my fingers bringing out more flavor. The ingredient is essential to bringing the whole thing together - it added flavors that are usually provided by a sauce.

BEHIND THIS BITE
This has to be one of my top three pizzas ever. It was light and tasty and I love roasted red peppers. I could see this being an opening course for an important dinner like a wedding party or even a Valentines meal, only I would call it “flat bread” just to make it sound fancy.

This pie delivers the boom. In the last year alone I’ve made at least 12 pizzas and posted them here. All are unique and gourmet so I created a link where all of them can be found.

Eat well, cook often ...

THE RECIPE
Make 2 12” pizzas; 30 minutes
Divide over crusts

2 Tbs Olive oil
2 C Mozzarella cheese, shredded
1 jar Artichoke hearts (6 oz)
1 jar Roasted red pepper (7 oz)
1 tsp Oregano
1/2 C Parmesan cheese, fresh grated

Assemble and bake pizza
On pizza crusts layer olive oil, mozzarella, artichoke, roasted red pepper, oregano and parmesan. Bake in a preheated 425° oven for 7 to 10 minutes or until cheese is melted and bubbly.

Loaded Baked Potato Soup


Printable version
I made this soup with the potato I had leftover form making potato skins. I knew I would have a good amount reserved as well as extra bacon and cheddar cheese – which is perfect for making loaded potato soup. I view this dish as a liquid with everything wonderful about a loaded spud from a steak house blitzed together into drinkable form! (With a little depth added from the root vegetables.)

Using bacon in the base of any potato soup is pure culinary gold. Bacon in general is culinary gold, but the smoky hint that it provides next to the mild flavor of potato just seems to be a magical combination! Add the mirepoix and garnishes and BAM - you’ve got a winner on your hands. 

BEHIND THIS BITE
This soup and the potato skins from my last post are a great combination for a Super Bowl party because it’s like getting two for one. Both are made from the same batch of baked potatoes. Heck, if you get lazy or tipsy on booze while baking the potatoes you can quit right there and have a yummy baked spud if need be.

There are many different direction that this soup could be taken, I went with the loaded theme simply because of the extra ingredients I had around. I could have very easily went with potato and leeks. (which is my favorite soup of all-time) Potato soup is a nice compliment to the skins and both are great in any party spread.

Eat well, cook often ... 

THE RECIPE
Serves 4; 45 minutes
4 strips Bacon diced
1 C Onion diced
1/2 C Celery diced
1/2 C Carrot diced
1 Tbs Garlic minced
4 C Chicken broth
3 C Potato cooked
DIVIDE AMONG BOWLS
1/2 C Cheddar cheese shredded
1/4 C Green onion sliced

Make base
Over medium heat in a soup pot, sauté bacon until cooked through, 7 to 8 minutes. Add onion, celery, carrot and garlic cook until soft, 6 to 8 minutes more.

Finish soup, blend, garnish and serve
Add chicken broth and potatoes bring to a simmer and cook 15 to 20 minutes. Adjust seasoning if necessary. Carefully move soup to a blender. Process until silky and smooth. Pour into a bowl and garnish with cheddar cheese and green onion.

Cheesy Baked Potato Skins


Printable version
Potato skins remind me of a part-time job I took at the Texas Roadhouse soon after relocating to Indiana in the Summer of 2010. They used leftovers to make them. Baked potato is an item that is not made to order, there has to be large batches prepared ahead of time. The Roadhouse utilizes leftover baked potatoes to make the skins as an appetizer the next day. I’m sure there are many restaurant that do this, but, I thought it was an interesting fact. That little tid bit has stuck with me long enough for me to mentally regurgitate it here.

A typical order came with cheese, bacon and a side of sour cream. I always took it a step further and would often smother them with chili. Looking back, that was a little overkill, but I would get them after busting my butt waiting tables. It's hard to not be over the top with food after you have served more than a $1,000 worth to customers and not been able to eat one bite.

One of the great benefits about making this recipe at home is that there is plenty of potato leftover, enough to make another potato favorite - which will be featured in my next post.

BEHIND THIS BITE
I never thought I would be doing something like waiting tables at a steak house. But, I had been in Fort Wayne for about three months and was really digging my new found spot at a little paper as the Visual Food Columnist, the only problem was that there was no pay. To me, getting the print space was all that mattered.

I had to build a portfolio of work and see if I could sustain it for the long run. In the news business, you have to be able to do your job, when the last thing on your mind is your job, meaning that your work has got to be good when it’s at it’s worst. Generally, you can look at a year’s worth of work and determine if your in the right spot.

In order to save money while I built my portfolio, I took some part time employment with my sister waiting tables. I thought it would be easy, but I will tell anyone this right now – to be a good server at a busy restaurant and make good money – you have to bust your ass!

It took me a couple of months learning the new trade. In the beginning, I totally sucked, I literally had to learn how to carry a tray of drinks.  During that process I drenched a baby with a glass of ice water - true story.

I worked hard and was determined to be good at it before giving up. The work paid off and I did become a good server. I’m proud to say that during the 9 months that I worked at the THR, I was secretly evaluated by customers working for corporate headquarters twice (neither was during the first couple of months thankfully) and both times I received a 100 percent score.

I proved I could sustain my food column and picked up the skills necessary to be a good waiter in the process. That said, I’m glad I don’t have to do that now. I quit waiting tables exactly a year after starting my food column, I could not wait to cash out my last table and I hope that I never have to do that again, but I will if I have to, waiting tables is probably the most lucrative part time job in Fort Wayne. The experience has made me work even harder at making a living as a food columnists - which is still a work in progress.

Eat well cook often ...

THE RECIPE
Serves 6; 2 hours
6 large Russet potatoes
1 Tbs Vegetable oil
1 Tbs Kosher salt
DIVIDE OVER POTATO SKINS
1 C  Cheddar cheese, shredded
5 strips Bacon, cooked & crumbled
1/2 C  Sour cream
1/4 C  Green onion, sliced 

Bake potatoes
Clean and rinse potatoes. Pat dry. Toss potatoes with salt and vegetable oil. Poke three deep holes in each potato with a knife. Place potatoes on a baking rack over a cookie sheet. Roast in a preheated 350° oven until cooked through, 1 hour and 30 minutes. Remove and let cool, slice in half. 

Make potato skins, garnish and serve
Scope flesh from potatoes with a spoon leaving a thin layer of potato attached to the skin. Reserve flesh for later use. Fill potatoes with cheese and bacon. Return to pan with baking rack and heat in 350° oven until cheese is melted and potatoes are heated through, 8 to 10 minutes. Remove and garnish with green onion and sour cream, then serve.

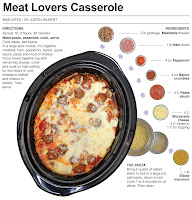
Meat Lovers Casserole


Printable version
This is a man’s meal.

It's loaded with meat - so much so that I advise any vegetarians to quit reading now - Your head might explode by the end of the next sentence. This casserole contains three and a half pounds of cooked animal flesh and five, yup, FIVE cups of cheese. Not to mention the pound of pasta and quart of sauce.

All said and done I bet there is 90,000 calories in this pot. Enough man fuel to power the Vegas strip on Super Bowl Sunday.

Adding to the Manliness of this casserole - it’s super simple, idiot proof.

All that is needed is to mix this stuff together and hit the cook button. I guess there is one difficult part - making the pasta. Which, to be honest, if that is difficult – like the vegetarians – stop reading this blog now because the recipes on the site will make your head explode.

I served this at a meeting attended by about 20 guys - it went so fast that not everyone there got to try a full helping. If your hosting a party for the defensive line of the Minnesota Vikings or catering a meal for the patrons of the local strip club, this should be on the menu.

BEHIND THIS BITE
Every so often I cook the hearty snack for a local church group that I attend. This recipe is what I made for them last Wednesday night. I really enjoy making things for the group because it’s really the only time I get to cook for a large group of guys, which is a different test group for recipes. Most women would look at this dish and see nothing but calories, some would dare to try it, and I’m sure would enjoy it, but many would turn away at the site. To be fair, there are guys out there too that would see this and wince.

I have found there is no better test for a Football party snack than this group of guys. If it’s good, there will be no leftovers - no matter what the amount. I made this with the intent of making to much. I thought there was no way they would eat it all - and I was totally wrong, in fact the opposite happened. There wasn’t enough!

This dish is a must if your hosting a Super Bowl Party.

Eat well, cook often ...

RECIPE
Serves 15; 2 hours, 30 minutes
2 lb package  Meatballs thawed
1 lb Ham diced
4 oz Pepperoni
4 oz Bacon crumbles
5 C Pasta sauce
5 C Mozzarella cheese
       (4 C mixed in, 1 C for topping)
1 lb Elbow macaroni

Make pasta
Bring 2 quarts of salted water to boil in a large pot, add pasta, return to boil. Cook 7 to 9 minutes for al dente. Then drain.

Assemble, cook, serve
In a large slow cooker, mix together meatball, ham, pepperoni, bacon, pasta sauce, pasta and most of cheese. Once mixed together top with remaining cheese, cover and cook on high setting for two hours or until cheese is melted and mixture is bubbly. Then serve.

Buffalo Chicken Nachos


Printable version
As part of the ultimate buffalo chicken experience I have been posting over the last week, I arrive at one of my favorite all-time snacks.

Nachos.

Buffalo chicken and nachos lend themselves to each other perfectly. Nachos are usually made with seasoned meat and are garnished after being cooked. This same concept is used in buffalo chicken, the garnishes being blue cheese dressing and celery. Plus, nachos and buffalo wings are party classics. I think it's only natural to combine these beer-bash Hall of Famers.

One of the keys to this recipe is tossing the chicken in the hot sauce, rather than dumping the hot sauce on the nachos, it assures the buffalo chicken taste with every bite and, if measured properly, eliminates the buffalo sauce overload - when the acid from the hot sauce accumulates on the taste buds and starts to ruin the experience.

In the end, buffalo chicken nachos worked as well as the pizza, sandwich and tenders from previous posts. They all deliver the buffalo chicken boom without the mess.

BEHIND THIS BITE
I made both the pizza and nachos at the same time when I documented the two recipes. I preferred the pizza. When I shared the leftovers with my parents. Dad liked the nachos. Both are great gourmet twists and party pleasers.

In the last week, I have made a number of buffalo chicken recipes. I have one more to make - the dip. That will be the finishing touch on my buffalo chicken extravaganza here at the Behind the Bites. I’m going to wait before I make the dip though. I’m little burned out on buffalo chicken. If I have to eat it again in the next couple of days I might go into buffalo chicken overload. I'll wait for the upcoming Championship Sunday when we find out who'll be playing in the Super Bowl.

Eat well, cook often ...

THE RECIPE
Appetizer for 4; 25 minutes
BUFFALO CHICKEN
2 Tbs Unsalted butter melted
1 Can Chicken white meat (12.5 oz)
1/4 C Hot sauce
DIVIDE FOR TWO BATCHES OF NACHOS
1/2 bag Tortilla chips
2 C Mozzarella cheese
Buffalo chicken
1/2 C Blue cheese dressing1/4 C Celery diced

Make buffalo chicken
Melt butter in a microwave on high in 20 second intervals, stirring in between. Mix together butter, chicken and hot sauce until well incorporated.

Assemble, bake, garnish and serve
On an oven safe pan layer chips, cheese, chicken and another layer of cheese. Bake in a preheated 425° oven for 5 to 7 minutes or until cheese is melted and bubbly. Garnish with blue cheese dressing and celery, then serve.

Buffalo Chicken Pizza


Printable version
After using the Buffalo Chicken Rub from Williams-Sonoma – and loving the results – I was inspired to create my own buffalo chicken recipe. A large part of the reason I liked the rub so much was that I got all the great buffalo chicken flavors without being covered in sauce or getting an overload of it on my taste buds.

Eliminating the mess was relatively easy, it just requires a delivery method other than bare hands. I decided that a thin pizza crust would be optimal, a sandwich has a top and bottom bun which makes the bread a major element with each bite, a thin crust pizza is more like a cracker or chip and is really just an edible utensil for delivering the toppings.

To eliminate the overload of hot sauce, I toss shredded chicken in the mixture before I put it on the pizza, rather than dump the sauce on the crust like traditional pizza sauce. Blue cheese dressing and celery are added after the pizza comes out of the oven. The end result was one of the best buffalo chicken meals I have ever eaten.

I highly recommend this if you're hosting a Super Bowl party. The guests will love it.

BEHIND THIS BITE
I did a test run of this recipe over at my cousin Jessie’s house. I stopped over to visit her and her husband earlier in the week to catch up and have them critique my new creation. I’m glad I had two pizza crusts and enough ingredients for two pies because my cousin Jessie had a ton of ideas as well, and was bound and determine to take over the pizza making responsibility for the night.

I thought it was so funny, she takes after her late mother and aunt (my mom) so much. They are busy bodies and can hardly stand to see someone doing work without pitching in. Which is great, except, if you let them do to much they end up taking over the process.

Total Divas!

Now, when your cleaning the garage, this is a good thing. Ask them for a little help and before you know it they are telling you to get the hell out because all your doing is getting in the way. But when your trying to cook a recipe for your blog — not so much.

While making the pizzas I had to draw the line, I told her I needed to make the first one the way I had planned and the second could be all hers. It worked out well because the pizza I made (this post) worked perfect - a buffalo chicken experience - without the mess. Her pizza was a gourmet chicken pizza and gave me a great idea. But you’ll have to wait for that post in the future.

Eat well, cook often ...

THE RECIPE
Make 2 12” pizzas; 30 minutes
2 Tbs Unsalted butter melted
1 Can Chicken drained (12.5 oz)
1/4 C Hot sauce
DIVIDE OVER TWO PIZZAS
Buffalo chicken
2 C Mozzarella cheese
1/2 C Blue cheese dressing
1/4 C Celery diced

Make buffalo chicken
Melt butter in a microwave on high for 45 seconds to a minute, stirring once half way. Mix together butter, chicken and hot sauce until well incorporated.

Assemble, bake, garnish, serve
On a pre-made pizza crust layer, buffalo chicken and cheese. Bake in a preheated 425° oven for 8 to 10 minutes or until crust is golden brown and cheese is bubbly. Garnish with blue cheese dressing
and celery. Slice and serve.

Buffalo Chicken Burgers


Printable version
This is the second recipe I have created with Williams-Sonoma Buffalo Chicken Rub. First, I created chicken tenders – which were awesome. This time I used the same directions (from the package) to cook the chicken, only this time I made a sandwich with blue cheese dressing and lettuce.

I loved it - even more than the tenders.

The bread, lettuce and dressing that accompanied the chicken with every bite allowed the buffalo flavor to be a little more subtle than with the tenders.

Once again, the rub is a much preferred replacement to the messy buttery hot sauce that seems to drip everywhere when eating all things buffalo. I thought the sandwiches would be loaded with seasoning because each patty got half a tablespoon of the seasoning, but to my surprise it was really the perfect amount for each patty.

Before I knew it, I had inhaled two of these. I literally had to stop my self from eating half of a third patty by itself. If given the choice, I would choose the sandwiches over the tenders, but both would be a good meal any day.


BEHIND THIS BITE
As I mention before, what I love about this rub is that I get the flavor of buffalo chicken without the mess. It seems whenever I get anything that is buffalo chicken, I have buttery hot sauce dripping from my elbows and chin by the time I’m done. The dry rub really eliminates that.

I’m the kind of person that grabs a stack of napkins to eat a regular meal because I don’t like sloppy eating and is often the reason I won’t get chicken wings or ribs - I hate meals that require a shower after eating them. I think that is why this rub appeals to me so much - It provides the buffalo without the mess.

I’m taking this as a challenge - I’m going to use the traditional hot sauce and butter mixture to flavor a buffalo chicken meal or appetizer that has little or no clean up. Stay tuned.

Eat well, cook often ...

THE RECIPE
Makes 4 sandwiches; 45 minutes
For chicken
1 lb Ground chicken, made into 4 patties
2 Tbs Williams-Sonoma Buffalo Chicken Rub

For baste
4 Tbs Unsalted butter, melted
2 tsp Williams-Sonoma, Buffalo Chicken Rub

For the sandwiches
4 Hamburger buns
1/2 C Lettuce, shredded
1/4 C Blue cheese dressing

Marinate chicken patties
Season patties with 2 tablespoons of Buffalo Chicken Rub and salt to taste. Let marinate for 30 minutes, allowing chicken to reach room temperature.

Grill and baste chicken
Melt butter over medium heat and mix in remaining seasoning. Grill chicken until cooked through 8 to 10 minutes, turning at least once. Near the end of cooking baste chicken with butter mixture. Remove and let rest at least 5 minutes.

Assemble sandwiches
On a bun place chicken, then top with blue cheese, lettuce and top bun. Then serve.

Buffalo Chicken Tenders


Printable version
One of my favorite stores to visit is Williams-Sonoma. It’s more pricey than most, but they offer the best selection of culinary equipment and specialty goods out there. They also offer great deals on discount items. It’s the first thing I look for upon entering the store.

This past weekend I found some Buffalo Chicken Rub for 50% off. I have used their rubs several times before and they are always tasty - needless to say, I snatched up a can right away. The mark-down, plus the chefs discount I get from them allowed me to walk away with the rub for $4. That is cheaper than most spice blends you could find at nearly any other store.  Directions for how to use it with 1 pound of chicken are printed on the side of the container. I follow those directions exactly with this recipe. I wanted to see what the manufactures intended for it to taste like.

It made for delicious buffalo chicken, without the mess and overload of hot sauce which are common with traditional wings or buffalo chicken recipes. The butter baste and blue cheese on the side are key flavor additions. I’m impressed enough with these buffalo chicken tenders to make them for my next football party.

BEHIND THIS BITE
This is a new type of post for me. I often buy products like this and recreate them, but this contains flavoring that is not easily replicated. I decided to use the product in two ways. First is to replicate the recipe suggested on the package, which is what we have here. For the next recipe, I’ll use the same technique, only I’m going to make a sandwich out of the chicken.

Eat well, cook often ...

THE RECIPE
Serves 2 to 4; 50 minutes
For chicken
1 lb Chicken tenders
2 Tbs Williams-Sonoma
Buffalo Chicken Rub
For baste
4 Tbs Unsalted butter
2 tsp Williams-Sonoma
Buffalo Chicken Rub
1/4 C Blue Cheese Dressing 

Marinate chicken
Season with 2 tablespoons of Buffalo Chicken Rub. Let marinate for 30 minutes, allowing chicken to reach room temperature. 

Grill and baste chicken
Melt butter of medium heat and mix in remaining seasoning. Grill chicken until cooked through 8 to 10 minutes, turning at least once. Near the end of cooking baste chicken with butter mixture. Remove and let rest at least 5 minutes before serving. Serve with blue cheese dressing for dipping.

The Cuban Pizza


Printable version
I love Cuban sandwiches.

Unfortunately, they are not as prevalent on menus here in Fort Wayne, Indiana as they are in New York City, which has forced me to create my own several times since relocating two years ago.

After roasting a pork loin for a Christmas eve dinner I had a decent amount left over. As we were cleaning up I bagged the leftovers and instantly thought of making Cubans with it. Instead of making sandwiches I thought it would be fun to change it up and turn it into a gourmet pizza.

The pizza turned out magnificent.

The star of the show was the pickles. I chopped up dill spears to about the equal size of the cubed ham. The combination of the savory meat, tartness of the mustard and pickle with the creamy cheese made for a delicious experience. I mixed equal parts Swiss cheese with mozzarella so it would melt better, the Swiss alone wouldn't get as creamy. I will be making this again for sure. Most likely for a Super Bowl or football playoffs party in the next few weeks.

BEHIND THIS BITE
Every July when I lived in New York my Mom would come and visit for a week. She would always bring a friend so that they could explore the city during the day when I worked. I would usually meet them for dinner after I was finished. I liked taking them to different types of restaurants so they could experience different cuisines.

One of the places I took them was a small Latin place in my old neighborhood near the 36th Avenue stop of the N train in Astoria. We got there late and the place was about to close, but the manager said it was ok to order. Apparently the cook wasn’t pleased that we were going to keep them a little while longer. My Mom ordered a Cuban sandwich and when it came to the table she said there was way to much garlic on it. I thought she was exaggerating because she never eats garlic and just a little bit is to much for her. Any amount will turn her away because she has an allergic reaction to it, especially when it’s raw.

My mom is not one to complain about food especially after closing time, so she didn’t return it to the kitchen. She is a veteran of restaurants, having waited tables part-time for nearly 30 years and she will never trust a cook who ruined her order the first time. She did the smart thing and had the manager take the sandwich off the bill. They never took it away and we ended up boxing it up.

I hauled it to work the next day for lunch. I really thought it was just a special sauce or garlic bread that had turned Mom away, like I said, she can’t really eat any garlic. I heated the sandwich up and I noticed the heavy garlic smell. I took a bite and nearly puked. I bet there had been 10 cloves of raw minced garlic smeared on the sandwich – it was inedible.

Clearly the cook was pissed at us for making them stay late, thank God mom didn’t return it - I can only imagine what that bastard in the kitchen would have done then – and I hope he didn't do anything that went unnoticed to any of our other plates. I never returned to the place despite being only a block from my apartment.

Eat well, cook often ...

THE RECIPE
Make 2 12” pizzas; 30 minutes
Divide over 2 12” pizza crusts
3/4 C Mustard
3 C Swiss & Mozzarella Cheese, shredded (1 1/2 C each)
1/2 lb Roasted pork, shredded
1/2 lb Ham
1/2 C Dill pickles, chopped

Assemble and bake pizza
On pizza crust layer mustard, most of the cheese, shredded pork, ham, pickle and the remaining cheese. Bake in a preheated 425° oven for 7 to 10 minutes or until cheese is melted and crust is golden brown.

Black Bean and Corn Salsa


Printable version
This is the second version of black bean salsa I have made since starting my visual food column. The first time was in June of 2010. It was the first recipe that I documented with a tripod and professional lighting. I went to Sunny Schick Camera Shop and ask for advise on how to improve my photography. I got some good advise and made some equipment purchases.

Soon after publishing the recipe, I left a part time job at the Texas Road House. I went full time into food writing. I immediately found that if I wanted to have a large publisher back a book I would need a great food blog. For the last year and a half this site has been the focus of my work. It has required me to learn to be a professional-level food photographer and immerse myself in a new art. I have a long way to go, but at the same time, I have come along way with the camera.

Learning how to properly style food and light it for the lens is a fascinating art, as fascinating to me as creating information graphics. I’m proud of how I have incorporated better quality photography into my work. It helps it to rise to another level in quality.

BEHIND THIS BITE
This recipe is different from the original ingredient-wise and it features a new technique I have been incorporating into my work. When appropriate, I have been trying to place a styled photo as the main art in the infographic, rather than a bird-eye view of the finished dish. It requires some serious art direction before the recipe is created and is made possible by creating a “virtual sketch” of the dish. I then build the final photograph into the layout. My favorite example of this technique can be found with my Homemade Thin Mint Cookies.

I’m really inspired by this new craft. It is satisfying on many different levels - from creating and eating the food, to designing and presenting, to photographing.

I hope 2013 is a great year for food writing and step by step documenting of recipes.

Eat well, cook often ...

THE RECIPE
Serves 4; 15 minutes
1 can Black beans, drained
1 can Corn, drained
1 C Tomato, diced
1/2 C Onion, diced
1 tsp Chili powder
1/2 tsp Cumin
Juice of 1 Lime

Combine and serve

In a bowl, mix together black beans, corn, tomato, onion, chili powder, cumin and lime juice. Salt to taste. Serve with tortilla chips.

Creamy Beef Stroganoff


Printable version
Beef stroganoff originated in Russia in the later part of the 19th century. A similar recipe can be found in a Russian cookbook from the 1870s. There are a number of stories about it’s true inventor though.

One is that it was created for Count Grigory Stroganov, a man said to have loved to entertain, but had no teeth. The dish would be ideal for him to consume if indeed he had no choppers. A chef for Russian diplomat Alexander Stroganov is also credited. Regardless of origin, the recipe bears the family name.

The dish made it’s way to the United States in the late 1940s after World War II. There are countless variations, but most feature beef, noodles, mushrooms and sour cream. For this recipe, I stick with tradition but I change it up a little with the sauce. Instead of sour cream, I use a combination of cream cheese and heavy cream. For extra flavor – onion, garlic and fresh thyme are added, creating a rich and savory sauce.

BEHIND THE BITES
I made this for our family get-together Christmas Eve. I found stew beef at a great price the day before and thought beef stroganoff would be a good dish for the party. Put it with the pulled pork sandwiches my Mom was making and we would have enough for a couple of main dishes to feed the relatively small gathering.

I would usually have made a flour based cream sauce for a dish like this but I saw the heavy cream/cream cheese combination in the Nov/Dec issue of Cuisine at Home and thought I would give it a shot. I really thought the overall dish tasted great. The fresh thyme and mushrooms with the savory beef were dominant flavors and the cream brought everything together.

WHAT A NAME!
This dish is named after the Russian Stroganov family. Modern day High school in America would have been brutal for the Stroganov kids. I bet they wouldn’t set foot on the bus without hearing things like “Is your beef raw after strog an-ov?” or “Do a lot of strog an-ov this weekend?”  Even the most righteous kids would find it hard to resist teasing their peers with a last name like that.

Eat well, cook often ...

THE RECIPE
Serves 4; 2 hours, 45 minutes
2 lbs Stew beef
1 lb Mushrooms sliced
1/4 C Onion diced
1 Tbs Garlic minced
1 C Heavy cream
2 oz Cream cheese
1 Tbs Fresh thyme
1/2 lb Egg noodles

Cook beef

Season beef with salt and pepper to taste. Over medium-high heat, brown beef in a large pot. 5 to 7 minutes. Cover beef with water, bring to a boil, reduce heat and simmer 2 hours or until beef is fork tender, then drain.

Start noodles, mushrooms
For noodles see below.
Sauté mushrooms over medium heat until juice is rendered 8 to 10 minutes. Add onion, garlic, salt and pepper to taste. Cook until fragrant, 1 to 2 minutes.

Make sauce, add beef, serve
Stir in heavy cream, cream cheese and thyme. Heat sauce until cheese melts and sauce thickens. Add beef and simmer until mixture is heated through. Serve over noodles.