Smoky Chipotle Turkey Chili

Printable version
For the past three Thanksgivings, I have cooked a turkey or turkey breast and traditional sides with my culinary twist applied to publish here. This year, I’m doing something different for the more progressive culinary crowd.

For a main course I have created a smoky chipotle turkey chili!

To enhance the smokiness of the dish I start with diced bacon so that the flavorful renderings can be used to saute the aromatics. I removed the bacon after its cooked and use it as a garnish for the final dish.

Turkey is the star but it really just acts as a canvas for the flavors to stand upon in this recipe. I use a whole can of chipotle chiles in adobe, that I deseed and mince, with cumin and Mexican oregano for the main spice, but to enhance the smoke even further and compliment the chipotle, I add smoked ham hocks to the pot. After a long simmer that reduces the liquid and melds the flavors  – a silky, smoky and meaty chili emerges that can stand tall in any Thanksgiving spread.

BEHIND THIS BITE
My new blog work station.

I’m Back!!!!!!!

After relocating my life 120 miles to the west, I’m finally settled enough to start bloggin' again. I still have a man cave to build and a couple of other projects that will take time away that would other wise be applied here, but I’m finally settled enough to document some of my culinary creations.

I had to convert half of my dinning room into a kitchen work space and food photography studio to do it. I’ve also had to get used to a new place of employment and just move into a new home in general. In the process, I confirmed what I had thought five years ago.

Moving sucks.

Whether it’s across the street or across the country. Having to physically move every thing you own form couches to paper clips is a massive pain in the ass. But, it’s also a new beginning once all of the boxes are in place, which for me has been pretty exciting.

I had to down size significantly when I left New York, so there has been lots of stuff that had to be built or purchased in general just to have a spot to come home to watch TV without a mess in front of me. Now, I can finally do that as well as create a post like this.

I’m happy to have the blogging stuff checked off the list, but what I’m looking forward to most as part of the move is unpacking and displaying my ridiculous Star Wars collection. I just have to build the shelving to house the collectibles as well as the 80 some boxes of books that fill half my bed room!

Yep. I’m a pack rat. Which makes moving even worse!

Eat well, cook often ...

THE RECIPE
Just a small part of the Star Wars collection!

Serves 4 to 6; 3 hours
4 strips Bacon, diced
3 lbs Turkey ground
2 C Red onion, diced
2 Jalapeños, diced, seeded
2 Tbs Cumin
1 Tbs Mexican oregano
2 Tbs Garlic, minced
1 can Chipoltes in adobe, minced (7.5 oz)
1 can Crushed tomatoes (28 oz)
4 C Water
1 lb Smoked ham hocks

Render bacon, brown turkey
In a 6-quart dutch oven over medium-high heat cook bacon until crispy, 6 to 8 minutes. Remove with a slotted spoon and set aside. Add turkey to pot, sear until just cooked through stirring occasionally, 8 to 10 minutes. Remove to a bowl.

Create flavor base
Add onions and jalapeño to pot, saute until soft, 4 to 6 minutes. Add chipotle, cumin, Mexican oregano and garlic, let cook 1 to 2 minutes or until fragrant.

Make chili
Stir in crushed tomato, water and browned turkey. Add ham hocks. Bring to a boil, reduce heat and simmer for 2 to 2 1/2 hours, reducing mixture by one-third. If necessary add more water. Stir occasionally. Remove from heat, discard ham hocks and serve. Garnish with reserved bacon bits.

Getting settled in a New Place

The view from the balcony at my new apartment.

I have relocated to Merrillville, Indiana, just outside of Chicago!

I started a new full-time job as a designer for Lee Enterprises at their newspaper design hub located in the building that houses The Times of Munster, a Lee publication. After 218 weekly-visual-food-columns and more than 300 recipes documented, I felt that it was time to return to a full-time journalism gig. I wasn't planning on it, in fact, I had thought that my days in a newsroom were over. But, as the details of the job emerged, so did my interest. After much thought, I decided to give it a shot.

I hope to use my food talents at my new place of employment and I'm sure that will happen in some way, shape or form once I've built good relationships with editors and find the right opportunities to showcase my skills. As I get up to speed with the new job I find myself pretty excited about having to get my hands dirty assembling news and information on a daily basis again.

My food creations have re-ignited my passion for news design and information graphics. To me, the last four years was like getting a masters or phd in visual storytelling and I'm looking forward to see how I can apply some of what I have learned to my new job.

I'm happy to finally be settling into my new place and finding other things to do besides stuff related to moving in.

I've been cooking a lot in my new kitchen and I'm in the process of turning my dinning room into a food photography studio like the one at my old place – only this one will be much nicer and better organized. (Not to mention the new studio has running water! No more filling a tub with dirty dishes and hauling them down a flight of steps to be cleaned. Wahooo!)

Also, I have a gorgeous balcony that faces North (the view from which is pictured above, and will be the perfect place for using natural sunlight to illuminate my styled food shots and hopefully add another dimension to my photography in general.

Thought it was time for an update, look for more recipes here in the very near future.

Eat well, cook often ...


Relocation Underway!


Big changes are coming for Behind the Bites. A big move and a new adventure awaits! Details coming soon.

Slow Cooker Pulled Pork

Printable version
I was out grocery shopping recently and was looking for a bargain at the meat case. The best deal I could find was on bone-in pork shoulder. Considering that it’s July, I was hoping for something a little more grill-friendly and not so chewy, but I decided to go with it. A large cut can easily feed an entire family, or in my case provide a couple of different meals for during the week.

I used a simple homemade spice rub for seasoning but I could have just as easily used a pre-made rub found in any super market. I then seared the roast in a hot cast iron pan to create a flavorful crust on all sides. After that, I did the easiest thing possible in the world of culinary arts — Placed it in a slow cooker, walked away for hours then returned to find fork tender meat ready to be devoured.

It’s not as sexy as preparing it on a grill or smoking it in a barbecue pit but the end result is tender and juicy meat that can easily be used for sandwiches, nachos or just eaten by itself.

BEHIND THIS BITE
Slow Cooker Pulled Pork

I had a number of different dishes in mind to make with shredded pork as the star. I had provisions to make sandwiches, tacos, burritos and nachos — I could have even made shredded pork egg rolls.

As I mulled my options over, one thing never changed – how I was going to cook the meat, and when push came to shove, I skipped all the foofoo and just went with the basic technique of making shredded pork to present here. I’m glad I did, because from this recipe I, or anyone that makes it, can take the pork and use it any way they choose.

Eventually, I made nachos and sandwiches with this batch. The nachos were tasty and different - it was the first time I had eaten shredded pork nachos and I can say with certainty it won’t be the last time I have them either, but I don’t want to say much about that – I’ll share the pork nacho recipe with my next post.

Eat well, cook often ...

THE RECIPE
Slow Cooker Pulled Pork

Serves 6; 4 to 8 hours
4 lb Pork Shoulder Roast
1/2 C Spice rub for pork
1 large Onion
1/2 C Water

Season, sear
Season roast on all sides with spice rub, work in with hand if necessary. Let roast marinate for at least 20 minutes. In a cast iron skillet over medium-high heat, sear roast until a crust forms, 2 to 3 minutes per side.

Cook, shred
Place roast in a slow cooker on top of a bed of sliced onions and a half cup of water. Cover and cook on low for 6 to 8 hours, or high for 3 to 4 hours, or until roast tears apart with fork. Remove from slow cooker and shred meat, then serve.

Teriyaki Beef Kabobs


Printable version
There is something awesome about food on a stick. I’m not sure what makes it so awesome – all I know is no matter how old I get, I’m still a sucker for corn dogs and popcycles.

One of my favorite stick foods is kabobs cooked on the grill. I make them differently depending on the meat I’m using. When I opt for chicken or pork, I separate the veggies from the protein so that I can cook the meat all the way through and not over-cook the veggies in the process. I don’t worry about that when I make beef kabobs. I like my steak rare to medium-rare which is the perfect amount of time to make the veggies al denté, or a little bit crunchy.

For this recipe, I use a New York Strip steak for the meat along with red peppers, red onion and mushrooms. I brush on teriyaki sauce for a marinade and season it with salt and pepper. After a nice sear on the grill, the end result is juicy chunks of steak with a nice variety of vegetables – served all together on a stick!

BEHIND THIS BITE
Teriyaki Beef Kabobs

In my 12-plus years living in New York City I devoured a lot of street cart food – it’s as convenient as fast food is in the Midwest. My first apartment was near the 36th Ave. Stop on the N train in Astoria. Right underneath the stop (the N train is elevated in Queens) was a small Irish bar named McGrath's that was in business for more than 80 years, but closed in the summer of 2001.

I used to stop there for beers on my way home before it closed its doors. Every Friday and Saturday night an Eastern European man would set up his Kabob cart just outside the bar near the stairs to the train. He didn’t have much variety. Just an all-beef kabob with a piece of toasted bread, which really hit the spot after a few cold ones.

I’ll never forget being at McGraths one night when I noticed one of the regular patrons facing the corner and crunched over. She was a rather large lady and her body language seem to indicate something was wrong and she didn't want anyone to notice. I approached her to see if everything was ok, when she turned from her hidden spot in the corner I noticed she was chewing a mouthful of something with an empty kabob stick in one hand and a toasted piece of bread in the other. She nodded to indicate everything was ok and seemed a little embarrassed.

I had interrupted her clandestine swaray with a beef kabob from the snack peddler beneath the train stop!

I felt as though I had accidentally walked in on a roomate having sex — Which is comparable to the rush one would get from a grilled beef kabob after a few pints of beer near the 36th street stop in Astoria.

Eat well, cook often ...

THE RECIPE
Teriyaki Beef Kabobs

Serves 2; 30 minutes
1 lb New York Strip, steak cut into 1-inch cubes
1 Red bell pepper, cut into 1-inch pieces
8 oz Baby bella mushrooms
1/2 Red onion, cut into 1-inch pieces
1/2 C Tyriaki sauce
8 Skewers

Assemble and grill
Alternately place onion, peppers, mushroom and steak on skewers. Brush with teriyaki sauce, season with salt and pepper to taste. Let marinate 20 minutes then cook to desired doneness on a prepared grill. Rest 10 minutes, then serve.

Easy Skillet Baked Beans


Printable version
When cooking outside most people think of a cut of meat being seared over flames, but there are a number of side dishes that can be made with a skillet on a grill or fire as well. One such dish is baked beans, which can be baked, but more often is a dish of beans that are stewed in a sauce. The Native Americans used to prepare them with maple sugar and bear fat in a pit lined with hot stones. Early colonists replaced the pit with a pot, the bear fat with hog fat and the dish evolved into the baked beans that we have today, according to the Oxford Companion to American Food and Drink.

For this recipe, I make a version of baked beans that isn’t baked at all. The entire dish can be prepared in a skillet on a stove top or grill. It features canned cannellini beans, bacon and diced tomatoes that are held together by a mixture of common sauces and heated through. The dish comes together quickly and is a perfect compliment to grilled meat on a warm summer night out on the patio.

BEHIND THIS BITE
Easy Skillet Baked Beans

During the summer most of my recipes evolve around the grill – mostly sauces and rubs for different cuts of meat that are cooked over a fire. Sprinkled in with all the grill-centric recipes are sides that go with such creations — Baked beans is one of those sides.

This recipe is super simple and is intended to be made in a cast iron skillet over the flames, right next to the protein as it sears on the grill grates. Baked beans are really an ideal side dish at a barbecue because the beans are cooked in a saucy bath that is much like barbecue sauce in the first place – in fact, this recipe actually has barbecue sauce as one of the ingredients.

I had been contemplating a baked beans recipe for some time and I’m glad I’ve finally got down to publishing one — right in time for the hottest part of summer in Indiana.

Eat well, cook often ...

THE RECIPE
Easy Skillet Baked Beans

Serves 4; 25 minutes
4 strips Bacon diced
1 C Red onion diced
2 Jalapenos seeded, diced
1 Tbs Garlic minced
1/4 C Brown sugar
1/4 C Barbecue sauce
1/4 C Mustard
2 Tbs Worcestershire sauce
1 can Tomatoes diced
2 cans Cannellini beans
drained, rinsed

Sauté bacon, vegetables
In a skillet over medium-high heat render bacon until crisp, 6 to 8 minutes. Add onion and jalapeno, cook until soft 4 to 5 minutes, add garlic cook 1 minutes more.

Make sauce, finish

Stir in brown sugar, barbecue sauce, mustard and worsestershire to mixture, bring to a simmer, stirring often. 2 to 3 minutes. Mix in tomatoes and beans, heat mixture through stirring often. 4 to 6 minutes. Remove from heat and serve.

Grilled Asparagus Attempt 1


Yesterday, I attempted to document one of my go-to favorites – grilled asparagus. Any time I'm cooking a bunch of stuff on the grill at a gathering I grab a bundle, toss them in oil, salt and pepper and sear them lightly on the grill. I put them out first for people to snack on as I'm preparing more complex stuff and they're always a hit. I cook them just enough to brighten up the green color and soften them slightly. There is still lots of crunch left in the final product and they can be eaten like pretzel sticks.

They're simple and delicious!

So simple in fact, that I have avoided documenting them because there isn't much to document. As I shot the asparagus I knew that this was going to need much more planning than I had prepared for. The photos turned out ok but nothing I could use for a print recipe infographic. I had never photographed asparagus and I learned from my experience yesterday that this vegetable is gonna take some finesse to look good in front of the lens. I did get the shot above, but I was lucky to get that at best.

Rather than wait until I get a better handle on photographing asparagus, I'll give out the recipe – I can't keep it a secret any longer! It's so simple though that I'm not sure if it's a secret or even a recipe, all I know is that this is the way to eat asparagus!

Eat well, cook often ...

THE RECIPE
Appetizer, 30 minutes
1 bundle Asparagus
olive oil, salt and pepper

Toss asparagus in olive oil, and season with salt and pepper to taste. Place on a prepared grill and cook 2 to 3 minutes per side or until just starting to soften and green color brightens. Remove from grill, lest rest a few minutes, then serve.

Chicken and Cannellini Bean Soup


I made this soup for a gathering of 15 to 20 people. I had some extra bacon and a bundle of kale to get rid of and I knew a yummy soup was the place to put them. I didn't intend on sharing this soup here but after I tasted it I knew I had too. The rich and delicate broth was just to good to keep to myself.

I did something different with this soup that I had never done before. I had a good amount of brown bits stuck to the bottom of the pan that the steam from the onion and green pepper couldn't bring off the bottom, so I poured in a quarter cup of white wine. It helped me scrape up the bits for extra flavor, then I let the wine cook out before finishing the soup. Not only did I get the extra flavor from the brown bits but the white wine added a hint of sweetness to the overall flavor and really sent it to the next level. One of the guys at the gathering had three bowls and would have went for more had I not run out. His excuse for eating so much was that he couldn't get enough of the broth.

Mission accomplished!

Eat well, cook often ...

THE RECIPE
Chicken and Cannellini Bean Soup

Serves 15 to 20, 1 hour, 30 minutes
3 lbs Chicken thighs, boneless, skinless, cut into cubes
6 strips Bacon, diced
2 Sweet onions, diced
2 Green peppers, diced
1/4 C Garlic, minced
2 tsp Italian seasoning
1/4 C White wine
3 can Cannellini beans, drained, rinsed
3 C Kale, shredded, torn
8 C chicken broth

Brown chicken, make base
In a large pot over medium heat brown chicken thighs until just cooked through, 6 to 8 minutes. Remove to a paper towel lined plate. Add bacon and cook until almost crisp, 5 to 6 minutes. Add onion, green pepper and Italian seasoning, cook until soft, 3 to 4 minutes add garlic and cook 1 minutes more or until fragrant.

Deglaze, finish
Add white wine and scrap all brown bits from bottom of pan. Let simmer until wine cooks out 5 to 6 minutes. Return chicken to pot and add beans, broth and kale to pot. Bring to a simmer and let cook for at least 1 hour. Spoon into bowls and serve.


Asian-Style Chicken Wings


Printable version
I think my favorite charcoal grilled snack or appetizer would have to be chicken wings. I enjoy them fried, but I really love them cooked over the coals for two reasons. First is the grilled flavor – charcoal grilled chicken is probably my favorite meat behind a perfectly cooked ribeye steak. Second is the endless amount of sauces or spice rubs that can be applied to take their flavor to a different level. I rarely make my wings the traditional way, or buffalo style, and douse them in a hot sauce and butter mixture. I like to get creative with the sauce.

For this recipe, the wing coating features the fruity and sweet hoisin sauce, spice from sriracha and the aromatic ginger and garlic that all together provides an Asian-style flavor.       Like most chicken wing recipes, they’re messy! I ate them by myself for lunch, and I’m glad I was alone because the site of it would have given small children nightmares for years to come. I practically needed a fire hose to clean up the delicious mess.

BEHIND THIS BITE
Asian-Style Chicken Wings

It seems that boneless wings are becoming more and more popular at restaurants. They’re easy to devour with no worries of a bone getting in the way and they're just as tasty as traditional bone-in wings with the same type of white meat. For some reason though, I still lean toward the traditional bone-in style wings.

There is something much more interactive about having to pick all the meat from the bones rather than just tossing them back like popcorn. The effort to eat them seems to create a more enjoyable culinary experience for me. I could be crazy, well, in fact, I know I’m crazy – but that is just how I like my wings. Also, when cooking them it’s easy to tell when the wings are finished because the meat will recede a little from the bone making for a nice visual cue announcing the wings are ready to scarf down.

Now, I’m not gonna kick someone out of the kitchen for making boneless wings, I just have a slight preference for the traditional variety.

Eat well, cook often ...

THE RECIPE
Asian-Style Chicken Wings

Appetizer for 4, main course for 2; 35 minutes
1 1/2 to 2 lbs Chicken wings
2 tsp Ginger minced
2 tsp Garlic minced
2 Tbs Hoisin sauce
1 Tbs Honey
1 Tbs Sriracha sauce
1 tsp Sesame oil
1 tsp Rice vinegar

Grill wings
Prepare grill for cooking.
Season wings with salt and pepper to taste, then grill wings until cooked through, turning two or three times during cooking, 20 to 25 minutes. Remove wings from grill and let rest 5 to 10 minutes.

Make sauce, toss wings
While wings rest, in a sauce pan over medium heat, saute garlic and ginger in a little olive oil for 1 to 2 minutes. Stir in hoisin sauce, honey, sriracha, sesame oil and rice vinegar, heat to a simmer then remove. In a bowl, toss the wings and sauce together. Pile on a plate and serve.

Zesty Burger Sauce


Printable version
One way to put a twist on a burger and turn it from good to great is by creating a custom sauce for it. The Big Mac from McDonald’s is one of the most famous burgers in the world and part of its success is the “special sauce” that adorns it.

The majority of the time when I make a sandwich, I grab a salad dressing rather than ketchup or mustard to top it just to ad another layer of flavor. I’ll use ranch dressing on any cold meat sandwich because, to me, ranch is the bacon of the sauce world – it makes everything it’s used on taste better.

For this recipe, I make a custom sauce for burgers or any sandwich made with beef. It features horseradish which provides a spicy, aromatic quality that compliments the bold flavor of the meat. Garlic powder, chili powder and cayenne pepper add zest and spice to the sauce while mayonnaise and sour cream form the base and provide the creaminess. All together, this sauce will take any burger or roast beef sandwich to the next level of yum.

BEHIND THIS BITE
Zesty Burger Sauce

Now that summer is here and the majority of my cooking involves a grill or fire, I’m noticing a pattern. The real creative part of what I have been putting out involves compliments or additions to grilled meat – like this sauce. I make lots of spice rubs, sauces, marinades and side dishes when I’m grilling and for the last couple months that has been the focus of the food I have documented.

I love working the grill, but that is just a small part of making a great plate of food over the fire – a perfectly seasoned and cooked steak doesn’t need anything else to be amazing, which is why the compliments are so important. They must stand up to the meat and this sauce does just that. It was good enough to win the praises of my niece despite the fact that it's spicy. Usually she doesn’t like anything with even a hint of heat, but she liked this enough to eat an entire burger slathered with it.

If you like horsey sauce from Arby’s this is a must try.

Eat well, cook often ...

THE RECIPE
Zesty Burger Sauce

Makes 1 cup; 1 hour
1/2 C Mayonnaise
1/4 C Sour cream
2 Tbs Horseradish
1 Tbs Chili powder
1 tsp Garlic powder
1/4 tsp Cayenne pepper

Make sauce, refrigerate
In a bowl mix together mayo, sour cream, horseradish, chili powder, garlic powder and cayenne pepper. Once thoroughly combined, cover and refrigerate for at least an hour for flavors to meld. Use on burgers or beef sandwiches.

Relay For Life Salsa

Salsa verde and Salsa Rojo
For the last couple of years I have donated my time and food to the Relay For Life cancer walk in Whitley County, Indiana. My cousin Tammy is a cancer survivor and is a big contributor and driving force behind the fundraiser. Last year, I made 25 lbs of pulled pork for the Relay's survivor dinner. It always feels great to contribute to such a good cause.

This year, when Tammy ask me if I wanted to pitch in, she told me they were making a taco bar. I knew instantly what I wanted to contribute – authentic Mexican style taco sauce! I decided to make a salsa verde as well as a salsa roja and I wanted to charcoal grill the vegetables to add further depth to what I think is mandatory for a great taco - GREAT TACO SAUCE!

The night before, I bought the fresh vegetables and took them to the family campground where I crashed for the night. In the morning I woke up, brewed some coffee and fired up the charcoal. I grilled the vegetables and blended everything down in two batches making a quart of each type of salsa - plus a little extra for my own tacos later that night.

Fresh off the grill
I decided to go mild with these batches. I love hot salsa, but I have found the majority of people at large dinner events prefer mild to no spice. It almost disappoints me that so many people are afraid of the heat, but I accept it and make the adjustment when cooking for crowds.

I was really happy with how this salsa turned out, the smoky grill added an extra element of flavor to the salsas and the final product had a smooth and silky consistency. One thing I have been doing the last few times I have made taco sauce is letting it liquify in the blender for a good amount of time. I pulse it at first, then turn it to high and let it go for 5 or 6 minutes, I also add a little water to thin it out, which really makes it nice and easy to spoon onto the tacos!

Eat well, cook often ...

THE RECIPES
Salsa roja
4 medium Tomatoes, quartered
4 medium Onion, quatered
6 cloves Garlic
2 Jalapenos, stemmed and seeded
4 Ancho chilis, toasted
1/2 C Cilantro
2 Limes, zest and juice
2 Tbs honey
Water as needed

Salsa verde
10 tomatillos halved
4 medium Onion, quartered
6 cloves Garlic
2 Jalapenos, stemmed and seeded
1/2 C Cilantro
2 Limes, zest and juice
2 Tbs honey
Water as needed

Toss vegetables in a little olive oil, season with salt and pepper to taste. Grill until wilted and cooked soft. 8 to 10 minutes, rotating and moving around as needed. Put grilled vegetables in blender along with all other ingredients and blend until liquified, 5 to 6 minutes. Adjust seasoning if needed.


Custom Hot Dog Bar


Printable version
Hot dogs are a year-round guilty pleasure for myself, especially with chili! It’s the summer time though – when dogs seem to be synonymous with campfires and grills – that I eat them most. They’re one of the easiest meals that can be produced on a fire and only require hands to devour, making them ideal for backyard parties and 20 minutes snacks before heading off to the ball park.

Hot dogs can also be taken to another level of flavor with a few simple toppings. A can of chili, some nacho cheese or a slice of bacon and dressing from the fridge are all that is needed to put a flavor twist on this American classic. There are limitless combinations of garnishes that can be used, which make hot dogs an ideal center piece to a bar of toppings for a summer party.

This post contains a few suggestions for toppings that will create three distinct and delicious hot dogs, but adding more or mixing the toppings creates endless snack possibilities for around the campfire.

BEHIND THIS BITE
Custom Hot Dog Bar

This is the first time I have created my weekly print column and used only one photograph to illustrate the recipe, in fact there are 3 recipes in one photo! I just thought the best way to illustrate a column about a hot dog bar was to photograph three custom dogs with all of the ingredients visible.

It only took one shot!

This is a big moment in the four-year history of my food column! I’m not going to start doing one-photo recipes all the time, but if it makes sense to illustrate my concept in general, I will gladly try the one photo approach. In fact, I have already done it again with another column that I haven’t published yet but will in the next couple of weeks.

I really like how this turned out, there is something very magazine about one bold picture. I love the detailed multiple-photo approach that most of my columns feature, but I have to admit there is something very yummy about one big ol’ pic of delicious food!

Eat, well, cook often ...

THE RECIPES
Custom Hot Dog Bar

NACHO DOG
Nacho cheese, pickled jalapeno, crushed tortilla chips and a sprinkle of cumin.

REUBEN DOG
Corned beef, sauerkraut, swiss cheese and 1000 Island dressing

AVOCADO DOG
Avocado, bacon, tomato, onion and squeeze of lime

French Fried Onion Rings


Printable version
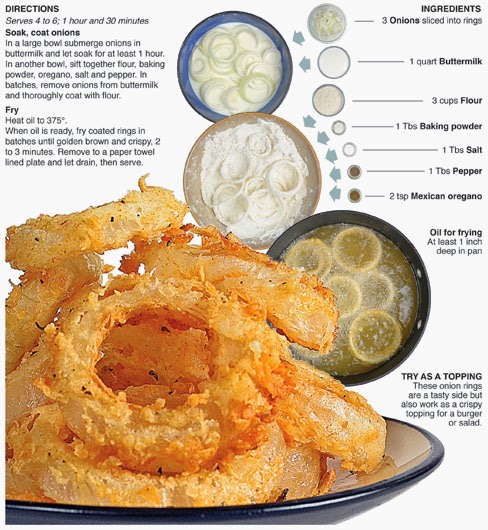
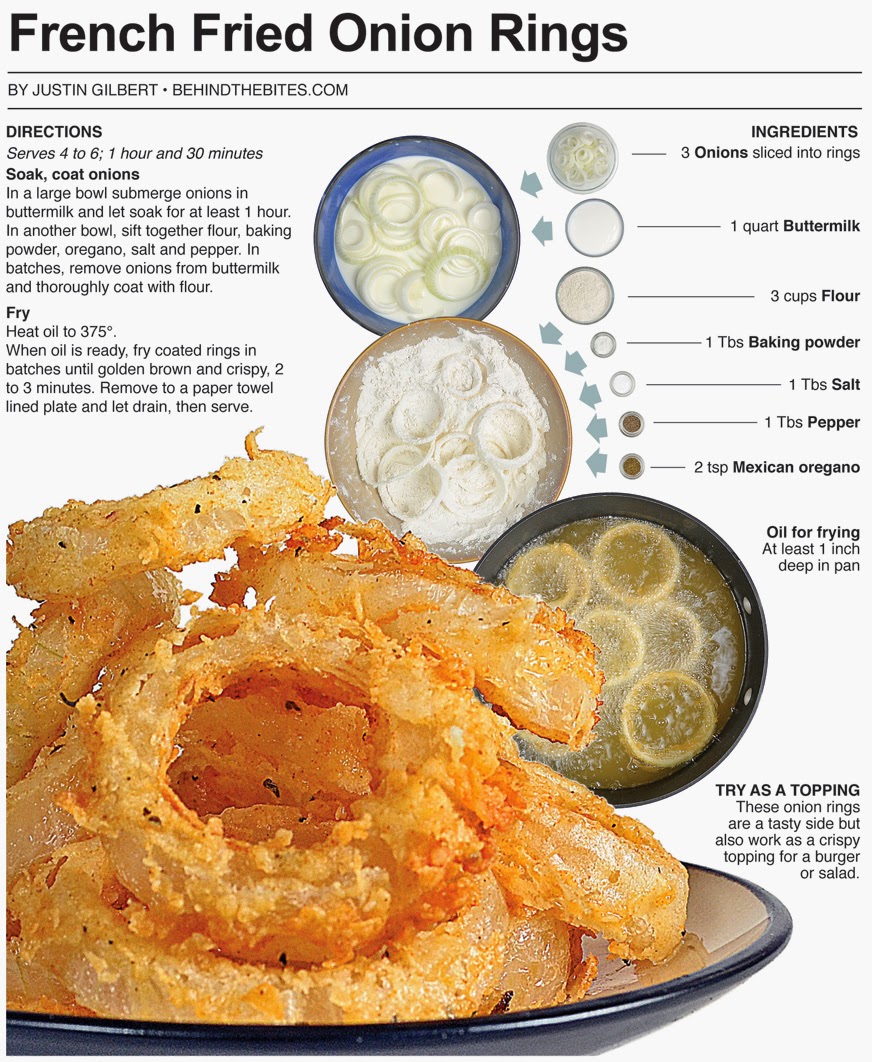
There are many in the culinary world who believe the onion ring was invented by a Dallas, Texas-based restaurant chain named the Pig Stand in the 1920s. But there are numerous recipes for batter dipped and fried vegetables, including onions, in American cookbooks published before the 20th century ever began, according to the The Oxford Companion to American Food and Drink. The Pig Stand is most likely the first retail outlet to serve the crispy fried treats but almost certainly not the true origin of the recipe.

Most onion rings have a thick crispy breading resulting from being dipped in a batter and fried. For this recipe, I went a different route. I treat the onions much like chicken, first soaking them in buttermilk, then dredging them through seasoned flour right before putting them in hot oil for a warm bath to cook them through. The end result is a light, crispy coating surrounding the star of the show – a sweet and delicious ring of onion.

BEHIND THIS BITE
French Fried Onion Rings

Onion rings change from cook to cook and restaurant to restaurant, but most are served with a thick and heavy breading that will often dominate the flavor of the entire bite. Beer breading is a famous preparation for onion rings and often I find the flavor of beer too strong. I’m a purist when it comes to beer, I like the flavor of it all alone, as it’s being poured directly on my taste buds.

Beer is added to batter because the carbonation gives it a lighter, airier texture and the beer is often a prominent flavor in the final bite. I actually like using seltzer water when making batters, because it provides the same light batter as beer, minus the beer flavor.

The onion rings in this recipe just completely avoids the whole batter thing in general. I have made onions this way before, the difference this time is that I left the rings whole. In the past I have used onion strings, because they were only intended for a topping. Whole rings allow these to be a side to a steak or sandwich rather than just a topping.

That is all.

Eat well, cook often ...

THE RECIPE
French Fried Onion Rings

Serves 4 to 6; 1 hour and 30 minutes
3 Onions, sliced into rings
1 quart Buttermilk
3 cups Flour
1 Tbs Baking powder
1 Tbs Salt
1 Tbs Pepper
2 tsp Mexican oregano
Oil for frying, At least 1 inch deep in pan

Soak, coat onions
In a large bowl submerge onions in buttermilk and let soak for at least 1 hour. In another bowl, sift together flour, baking powder, oregano, salt and pepper. In batches, remove onions from buttermilk and thoroughly coat with flour.

Fry
Heat oil to 375°.
When oil is ready, fry coated rings in batches until golden brown and crispy, 2 to 3 minutes. Remove to a paper towel lined plate and let drain, then serve.

Bacon Chipotle Mashed Potatoes


Printable version
Potatoes have to be one of the most versatile and loved things to eat on the planet (or at least in the Western Hemisphere). Fried, boiled, baked or even grilled (yes, they can be made great on the grill), whatever the preparation – they are delicious when made right. They're also one of just a few items that can be cooked in the microwave and you would never know it. On a plate they are usually a compliment to the main course but they can often steel the show. Kind of like Robin to Batman.

I still like to eat at McDonalds. Why? The Big Mac? Nope. Quarter Pounder? Nope. The fries are stupid good, best in of the fast food world as far as I’m concerned. I love them. And will likely eat at McD’s from time to time for as long as I live.

Now that I have gotten that out, it time to get down to business. Potato recipes are some of the most popular posts on this site. So every once in a while I like to get creative with the spuds and share it on the interweb.

For this recipe, I use bacon and chipotle pepper to add a smoky fire to some extra creamy mashed potatoes. And yes, I devoured the s**t out of these!

BEHIND THIS BITE
Bacon Chipotle Mashed Potatoes

I have documented well over 300 recipe in information graphic form since I began doing it 4 years ago. In that time, I have created a digital pantry of ingredients that I can re-use in recipes. I am trying to get my staple ingredients, like minced chipotle pepper, shot in every amount from teaspoon to quarter cup. That way when I use it in the future I don’t have to re-shoot it. I just get it from the digital pantry, much like I do when I’m actually cooking.

The prepped ingredients in this recipe are from the there. The bacon and potatoes needed to be shot because I didn't have those amounts photographed. All other shots were taken as I cooked and presented the recipe.

Here is the catch though.

The digital pantry made this a quick recipe to turn around, but ironically, I have been sitting on it for a couple of months! So much for quick turn around. Still, I’m glad to finally be sharing it.

Eat well, cook often ...

THE RECIPE
Bacon Chipotle Mashed Potatoes

Serves 4 to 6; 40 minutes
2 1/2 lbs Potatoes, peeled, diced
1 Tbs salt
1/4 C Unsalted butter
1/2 Milk
1/2 C Sour cream
4 slices Bacon
cooked, crumbled
1/4 C Chipotle in adobo, minced

Cook potatoes
Put potatoes in a large pot. Fill with enough water to cover potatoes by at least 1 inch. Stir in salt. Place pot over high heat, bring to a boil and cook potatoes until tender. 12 to 15 minutes.

Drain, Mash, serve

Drain potatoes in a colander. Return to pot and add butter and milk. Mash potatoes until creamy and smooth with a potato masher. Stir in sour cream, bacon and chipotle until well combined, place in a bowl and serve.

Smoky Chipotle Spice Rub


Printable version
Now that grill season is in full swing I like to make new spice rub combinations to flavor my food. Salt, pepper and the taste from a well seasoned grill is actually pretty good on its own, but the right combination of flavors in a spice rub can take food to another level of delicious or even transport a meal to different regions of the world.

I build my spice rubs much like I do a soup or a sauce. I start with base flavors like onion and garlic in their powder form, and salt and pepper is always present to enhance other flavors. Once I have the base I move onto the spices that will be more prominent and work together, like rosemary and thyme for example.

For this recipe, I have an onion and garlic base and use Chipotle chili powder as the star with cumin and oregano as compliments. Chipotle is much hotter than regular chili powder so brown sugar is added to balance the heat. In the end, this rub will add a spicy, smoky Mexican flavor to anything cooked over a fire.

BEHIND THIS BITE
A lettuce wrap disaster photo!

I used this recipe for my print column but it is only part of what I intended the recipe to be. The rub was used on chicken tenders that I grilled, topped with sauteed onions and red pepper then drizzled with a creamy lime sauce. I wrapped everything in a lettuce leaf and it tasted great. I was really happy with the results.

The only problem was the pictures.

The lettuce was out of control! I tried everything to get a good shot that looked like a delicious lettuce wrap. It’s just that the lettuce was like curly hair on a humid day. I just wasn't able to get it to look the way I wanted it. It ended up being a good learning experience. I went to plan B and made a salad-looking dish with all the ingredients, which turned out ok, but in the end, the best overall shots were focused on the rub.

I have found that lettuce is one of the hardest things to get right when styling food and photographing it. I’m sure there are many stylist and photographers that would agree. Thank god I took a few styled shots of the rub, otherwise, I might not have even had this to publish!

Eat well, cook often ...

THE RECIPE
Smoky Chipotle Spice Rub

Makes 1/2 cup; 5 minutes
2 Tbs Chipotle chili powder
2 Tbs Brown sugar
1 Tbs + 1 tsp Cumin
1 Tbs Salt
1 Tbs Pepper
2 tsp Onion powder
2 tsp Garlic powder
1 tsp Oregano

Make rub
In a bowl mix together chipotle powder, brown sugar, oregano, cumin, onion powder, garlic powder, salt and pepper. Liberally sprinkle on meat and rub in with fingers before grilling. Store in a tightly sealed jar.

FOR LESS HEAT
Replace the chipotle powder with regular chili powder for a less spicy and smoky rub that tastes more like a traditional Mexican seasoning.

Sausage and Egg Breakfast Tacos


Printable version
Sometimes mistakes in the kitchen turn into something great. I stayed with some friends recently and I took it upon myself to buy a few breakfast items to cook in the morning as a reward for putting up with me for the night.

My plan was omelets. The last thing in the skillet were the eggs and through my impatience I kept stirring the mix which scrambled them. Instead of a thick omelet like patty in the skillet I got a breakfast scramble that was perfect for a burrito or taco filling, but a little awkward to eat with a spoon from a bowl instead of wrapped in a tortilla with toppings.

My friends agreed I had the start of a great breakfast taco. For this recipe, I remake my breakfast blunder with some small tweaks. Sausage is the key element of flavor and it’s complimented by the sauted vegetables. The eggs add a fluffy and creamy texture. Salsa, cheese and cilantro are used as garnish and it’s served on a tortilla, helping turn a mistake into a great way to start the day.

BEHIND THIS BITE
Sausage and Egg Breakfast Tacos

I love turning tacos and burritos into breakfast items, which had always left me to dream about Taco Bell offering a breakfast menu. Well, that culinary dream has come true and last Thursday I ventured to my nearest Bell for a breakfast sampling.

I ordered a Waffle Taco and an A.M. Crunchwrap with steak. The taco had a manufactured flavor about it and I thought it could be reworked to make a little tastier.  The waffle had a syrup flavor infused in it and made it taste unnatural.

The A.M. Crunchwrap was simply spectacular and the best thing I have ever eaten for breakfast at a fast food chain. The hash brown, steak, eggs and cheese packaged into a toasted tortilla is an excellent breakfast item that can be eaten on the run. I really think the hash brown patty included in the mix really helped it stand out. I used a little mild salsa with each bite also.

They have a sausage and bacon option for the A.M. Crunchwrap and I plan to try them both next time I make a run for the border before 11 a.m.

Eat well, cook often ...

THE RECIPE
Sausage and Egg Breakfast Tacos

Serves 4; 30 minutes
1 lb Breakfast sausage
1 C Onion diced
1 C Poblano pepper, diced
1 Tbs Garlic minced
6 Eggs beaten
12 Flour tortillas
1/2 C Monterrey jack cheese, shredded
1/2 C Cilantro, chopped

Brown sausage, cook vegetables
In a skillet over medium-high heat cook sausage until browned,  remove to a paper towel lined plate. Add onion and poblano pepper, cook until soft, 3 to 4 minutes. Salt and pepper to taste. Add garlic and cook one minute more or until fragrant.

Finish filling

Return sausage to pan and mix through. Pour eggs into mixture. Let cook a minute then stir. Repeat until eggs are set and mixture is heated through 6 to 8 minutes.

Make tacos
Place filling in a flour tortilla and garnish with salsa, cheese and cilantro. Then serve.