Showing posts with label bacon. Show all posts

Bacon Chipotle Mashed Potatoes


Printable version
Potatoes have to be one of the most versatile and loved things to eat on the planet (or at least in the Western Hemisphere). Fried, boiled, baked or even grilled (yes, they can be made great on the grill), whatever the preparation – they are delicious when made right. They're also one of just a few items that can be cooked in the microwave and you would never know it. On a plate they are usually a compliment to the main course but they can often steel the show. Kind of like Robin to Batman.

I still like to eat at McDonalds. Why? The Big Mac? Nope. Quarter Pounder? Nope. The fries are stupid good, best in of the fast food world as far as I’m concerned. I love them. And will likely eat at McD’s from time to time for as long as I live.

Now that I have gotten that out, it time to get down to business. Potato recipes are some of the most popular posts on this site. So every once in a while I like to get creative with the spuds and share it on the interweb.

For this recipe, I use bacon and chipotle pepper to add a smoky fire to some extra creamy mashed potatoes. And yes, I devoured the s**t out of these!

BEHIND THIS BITE
Bacon Chipotle Mashed Potatoes

I have documented well over 300 recipe in information graphic form since I began doing it 4 years ago. In that time, I have created a digital pantry of ingredients that I can re-use in recipes. I am trying to get my staple ingredients, like minced chipotle pepper, shot in every amount from teaspoon to quarter cup. That way when I use it in the future I don’t have to re-shoot it. I just get it from the digital pantry, much like I do when I’m actually cooking.

The prepped ingredients in this recipe are from the there. The bacon and potatoes needed to be shot because I didn't have those amounts photographed. All other shots were taken as I cooked and presented the recipe.

Here is the catch though.

The digital pantry made this a quick recipe to turn around, but ironically, I have been sitting on it for a couple of months! So much for quick turn around. Still, I’m glad to finally be sharing it.

Eat well, cook often ...

THE RECIPE
Bacon Chipotle Mashed Potatoes

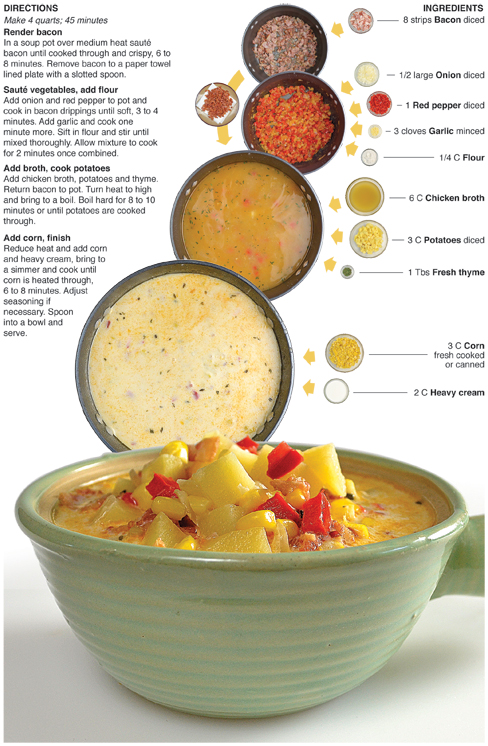
Serves 4 to 6; 40 minutes
2 1/2 lbs Potatoes, peeled, diced
1 Tbs salt
1/4 C Unsalted butter
1/2 Milk
1/2 C Sour cream
4 slices Bacon
cooked, crumbled
1/4 C Chipotle in adobo, minced

Cook potatoes
Put potatoes in a large pot. Fill with enough water to cover potatoes by at least 1 inch. Stir in salt. Place pot over high heat, bring to a boil and cook potatoes until tender. 12 to 15 minutes.

Drain, Mash, serve

Drain potatoes in a colander. Return to pot and add butter and milk. Mash potatoes until creamy and smooth with a potato masher. Stir in sour cream, bacon and chipotle until well combined, place in a bowl and serve.

Mini Bacon Tomato Toasts


Printable version
I think my favorite things to make in the kitchen are bite-sized savory snacks. It’s easier to experiment with tiny treats because it’s just one bite, and you’re not committed to filling your belly with it. This allows room to work with a new ingredient or add a little more heat than usual. A small snack with some spicy fire is much more tolerable than an entire main course, which can affect a person for hours afterward.

For this recipe, I make a bite sized play on the classic BLT. I use cherry tomatoes with bacon on little toasted bread rounds cut from a slice of bread. I replace the lettuce with a sprinkle of cilantro and add a special mayonnaise based sauce featuring smoky chipotle pepper, to compliment the bacon, and the juice and zest of lime to brighten up the flavor. The combination of the sauce and cilantro give this little mini bacon sandwich a spicy southwestern flavor that will help make a plate of these disappear as fast as common sense from a newly elected member of congress.

BEHIND THIS BITE
Mini Bacon Tomato Toasts

I rarely muse about my writing process, but I have a little insight to my thought process. For three years, while I lived in New York, I performed stand up comedy, which was long enough to have a few minutes of decent jokes to perform.

Good stand up is really about good writing, when I sat down to write new material I would start with a story and look for opportunities to insert something witty. Once I found a spot for a joke I would write several different punch lines until I found something that I thought would get laughs, often I would come up with a number of lines before I found the one that I wanted to perform.

I do the same thing when writing for my column and blog. I had an opportunity for a smart-ass comment in the last line of the intro. I ended up with the comment about common sense and politicians, which was my favorite line among many, that I brain stormed through. Here are some of the others that didn’t make the cut:

... help make a plate of these disappear faster than a crowd of teenagers from beer bash in the woods busted by the cops.

... help make a plate of these go down faster than glasses of beer on penny draft night at the local college bar.

... help make a plate of these disappear faster than a pocket full of change at convention for pan handlers.

... help make a plate of these disappear faster than free bullets at a gun convention.

... help make a plate of these go down faster than a 777 out of gas over the Indian Ocean. (ok, too soon)


I think I chose the best one.

Eat well, cook often ...

THE RECIPE
Mini Bacon Tomato Toasts

Makes 24; 45 minutes
1/2 C Mayonnaise, plus more for bread
2 Tbs Chipotle in adobo, minced
zest and juice of 1 Lime
8 slices Bacon
8 slices White bread
1/2 pint Cherry tomatoes halved
1/2 C Cilantro chopped

Make sauce, cook bacon
In a bowl combine the mayo, chipotle, zest and juice of lime. Place in refrigerator at least 30 minutes for flavors to meld. Place bacon on a broiler pan and cook 15 minutes until crisp in a pre-heated 425° oven. Cut strips into thirds.

Cut, toast bread
With a cookie cutter portion three rounds out of a each slice of white bread, making 24 total. Coat each side with a little mayo. In batches, toast in a hot pan until golden brown, flipping halfway through.

Assemble
On toasted rounds layer bacon, sauce, cherry tomato and garnish with cilantro. Then serve.

Meat Lovers Meatball Subs


Printable version
So, what happens when I notice that ground beef, bacon and Italian sausage are on sale at my local super market? Meatballs subs for dinner!

And you know what?

They were magically delicious.

The bacon and sausage were the star flavors and the ground beef was there more for volume. I made these in the afternoon and wasn’t sure what I was going to do with the finished product. I thought of trying them over pasta like traditional meatballs but wasn’t cracked about that because of their unique flavor. I flirted with dropping them into corn muffin batter then baking them off to make meatball corn muffins, but I ran into a problem which led to a great corn muffin recipe.

In the end, I decided that a sub with pizza sauce and cheese was the way to go. The combo of meats reminded me of a meat lover’s pizza so I thought a sub to carry those flavors would work well – and it did. This was probably the best meatball sub I have ever had, but then again, it’s the only meatball I’ve ever tried made of bacon, Italian sausage and ground beef - which is a tough meatball to compete with.

BEHIND THIS BITE
Meat Lovers Meatball Subs

I bought these sub buns at Walmart. I usually use these buns for photographing hot dogs because they look good in pictures and come without having been pre-sliced. I decided to try them with these subs which meant I had to hollow them out. This created a hot-dog-bun-sized bread boat to work with. I stuffed them with the meatballs and toppings then baked them off, which really did the trick.

They crisped up on the outside and were moist on the inside and provided the perfect delivery system for the tasty meatballs. They reminded me of mini French bread pizzas that had been toasted and made crisp. When I have used them in the past strictly for a good photograph they seemed a little chewy, I discovered that baking them toasts the outside and fluffs the inside. I want to try them again with brats or sausage from the grill. Walmart really came through with these buns!

Eat well, cook often ...

THE RECIPE
Meat Lovers Meatball Subs

Makes 44 to 48 meatballs;
12 sandwiches (with some meatballs leftover)

1 lb Ground beef
1 lb Italian sausage
1 lb Bacon finely, chopped
1 C Bread crumbs
1 C Parmesan cheese, shredded
2 Eggs
FOR THE SUBS
12 Fresh bake brat buns
1 C Mozzarella cheese
1 C Pizza Sauce

Make meat mix

In a large bowl mix together ground beef, Italian sausage and bacon until well combined. Mix in bread crumbs, Parmesan cheese and egg until all ingredients are well distributed.

Cook meatballs
Preheat oven to 400°
Roll meat mixture into 1-inch meatballs. Makes 44 to 48. Place meatballs in cups of a mini cupcake pan. Bake for 8 to 10 minutes or until internal temperature of meatballs reaches 165° Remove from oven. Place meatballs in a bowl and let cool to room temperature, 1 to 2 hours.

Make sandwiches
Preheat oven to 350°
Hollow out fresh baked brat buns. In bun place a layer of cheese, pizza sauce, 3 meatballs. Then top with a little more sauce and cheese. Bake subs until cheese is melted and bread is toasted, 10 to 12 minutes. Remove from oven and serve.

Wonton Poppers


Printable version
This is my favorite Super Bowl creation for 2014 - jalapeño wonton poppers. Which combines ... you guessed it ... Jalapeno poppers and wontons!

Wonton wrappers are paper-thin sheets made from flour, water, eggs and salt and are sold pre-packaged at most super markets. They can be filled with any number of ingredients or fillings and are usually steamed, boiled or fried. They are the Chinese cuisine equivalent to the Italian ravioli. The wonton is the perfect devise to deliver the popper filling for this recipe comprised of cream cheese, cheddar cheese, bacon, cayenne pepper and jalapeño.

Tradition poppers use either half or a whole jalapeño stuffed with filling and if you’re a popper fan like me, this means you may end up eating lots of jalapeños by the end of the night because they are simply to powerful to resist. Adding the jalapeño to the filling and using the wonton to deliver it requires much less of the spicy pepper and will help reduce indigestion caused by a spice overload.

BEHIND THIS BITE
Wonton poppers

I have passed by wonton wrappers a number of times in the last couple months, picked up a package and pondered what I should make with them, only to put them back and move on. This time I went to the store knowing what I wanted to do. I have learned to be careful when impulse buying unique items, like wonton wrappers, that are perishable.

I often buy things with the intent of making it in a couple of days or sometime during the week and the items sit in the fridge or pantry. The couple of days turns into a week and next week turns to two weeks and eventually what I bought has spoiled, dried out or wilted. I have gotten better at using everything I buy, but I still occasionally throw out an item or two. These wonton wrappers are easy to put off until tomorrow and very susceptible to being forgotten about until it's to late.

I know because it has happened to me twice in the last two of years.

So, if you’re not gonna make this recipe in the next couple days WAIT to buy the wonton wrappers. Don't just buy them to have 'em, they're easy to forget about and let go to waste.

Eat well, cook often ...

THE RECIPE
Wonton poppers

Makes 24 to 28; 45 minutes
4 slices Bacon, cooked, crumbled
3 Jalapeños, seeded, diced
1 C Cheddar cheese, shredded
8 oz Cream cheese, room temp
1/2 tsp Cayenne pepper
24 to 28 Wonton wrappers
Oil for frying

Make filling
In a bowl mix together bacon, jalapeno, cheddar cheese and cream cheese until thoroughly mixed.

Fill wantons
With a scoop, grab a teaspoon of the filling and place it in the middle of a wanton wrapper. Wet the edges, fold opposite corners together, then pinch to seal. Repeat until filling is gone.

Fry
Heat at least 1-inch of oil to 350° in a fry pan. In batches, fry wantons until golden brown, 2 to 3 minutes. Turn at least once in the oil while cooking. Remove to a paper towel let cool a little, then serve.

Bacon Wrapped Turkey Breast


Printable version
Over the last few years I have tried several different ways to cook turkey with good results. Last Thanksgiving, I fried a turkey for the first time and it was delicious. Before that, I had used a brine a number of times with great success. I decided to try something completely new this time and hoped it wouldn’t turn out as a culinary disaster.

Instead of a whole bird, I went with just the breast portion. For seasoning, I slathered it with a compound butter after patting it completely dry. Next, I wrapped the entire front side of the breast with bacon, so that as it cooked the drippings would keep it moist as well as enhance the flavor. Finally, I roasted the breast on a bed of quartered lemons and oranges and tossed in a bundle of fresh thyme for flavor – the citrus base steamed the breast from below.

The end result was a tender, moist and flavorful bite that my youngest nephew declared “awesome” after stealing a chunk from the cutting board just after I had carved it from the bone.

BEHIND THIS BITE

As I mention in the introduction, I have made turkey several times. Two of which I documented. These recipes are really what is behind this bite. Check them out!

Brined Turkey
Fried Turkey


THE RECIPE
Bacon Wrapped Turkey

Serves 6 to 8; 3 hours
4 Tbs Unsalted butter,softened
1 Tbs Italian seasoning
1 tsp salt
1 tsp pepper
5 to 6 lb Turkey breast
1/2 lb bacon
2 Oranges,quartered
4 Lemons,quartered
1 bundle Thyme

Prepare turkey
Preheat oven to 350°
Mix together butter, Italian seasoning, salt and pepper. Pat turkey dry with a paper towel then slather butter all over breast and under skin. Wrap bacon around breast, one strip at a time, starting at the top and working down until covered.

Roast, rest and carve
Place oranges, lemons and thyme in the bottom of a large roasting vessel, rest turkey on top. Place in oven and cook until a thermometer inserted into thickest part of the breast reaches 165°, 2 to 2 1/2 hours. Remove from oven and place turkey on cutting board, let rest 20 minutes. Carve and serve.

Smoky Creamy Corn Chowder


Printable version
A couple weeks ago I attended a dinner party at a friends house. The meal was made from meat, vegetables and fruit that the hosts had raised and grown right there on their own land. It was served family style around a huge table that comfortably fit the 15 who attended. The food was absolutely delicious.

Of all the tasty items that were prepared, one stood out – the sweet corn. The flavor was succulent and seemed to burst forth with each bite. I couldn’t control myself and ended up eating three huge servings.

After the dinner I complimented my friend on the great meal and excellent corn. His Dad had been growing that particular variety, Illini Xtra Sweet, since he was a kid. They usually stagger two or three plantings a couple weeks apart so they have corn to pick fresh for dinner for a long stretch during the summer. He gave me a few ears as a parting gift and I used it in this smoky corn chowder. It’s a tasty soup, but this variety of corn is off the hook all on its own.

BEHIND THIS BITE
Smoky Creamy Corn Chowder

The entire meal at my friends house was a step back into the past. The last time I had eaten a family-style meal of made-from-scratch, farm-raised ingredients was at my great grand parents more than 30 years ago. My great grandmother was a home maker and great grandfather a farmer. They raised and grew all of their own food and were able to provide for seven healthy children. That sort of life-style seemed to have disappeared with the rise of Walmarts and superstores of the modern day.

It was refreshing to have dinner at my friends house with a large group of comrades in this old-fashion style. The hosts really appreciated the farmed-raised and fresh grown aspects of a good meal, it was evident by the preparation. There were no fancy spice rubs or compound butters, just fresh food prepared perfectly. A humble meal free from pretense and full of great flavor. This is how the Great Spirit intended for us to eat.

Eat well, cook often ...

THE RECIPE
Smoky Creamy Corn Chowder

Make 4 quarts; 45 minutes
8 strips Bacon diced
1/2 large Onion, diced
1 Red pepper, diced
3 cloves Garlic, minced
1/4 C Flour
6 C Chicken broth
3 C Potatoes, diced
1 Tbs Fresh thyme
3 C Corn, fresh cooked or canned
2 C Heavy cream

Render bacon
In a soup pot over medium heat sauté bacon until cooked through and crispy, 6 to 8 minutes. Remove bacon to a paper towel lined plate with a slotted spoon.

Sauté vegetables, add flour
Add onion and red pepper to pot and cook in bacon drippings until soft, 3 to 4 minutes. Add garlic and cook one minute more. Sift in flour and stir until mixed thoroughly. Allow mixture to cook for 2 minutes once combined.

Add broth, cook potatoes
Add chicken broth, potatoes and thyme. Return bacon to pot. Turn heat to high and bring to a boil. Boil hard for 8 to 10 minutes or until potatoes are cooked through.

Add corn, finish
Reduce heat and add corn and heavy cream, bring to a simmer and cook until corn is heated through, 6 to 8 minutes. Adjust seasoning if necessary. Spoon into a bowl and serve.

Creamy Bacon Jalapeño Bites


Printable version
This is the second of my cream cheese and sour cream appetizers that I created for a group of friends. (Here is the first.) This time, jalapeño and bacon are the star ingredients and a tortilla chip with a slice of cheddar cheese is the method of delivery.

This appetizer was inspired by the jalapeño popper and features many of the same items found in the popular bar snack. This was my favorite of all the little treats I put out for the gathering. Bacon makes anything great but when combined with jalapeño and cream cheese the salty and smoky flavor really stands out.

Next time I need appetizers for a party I’m going to start with this and go from there.

BEHIND THIS BITE
Creamy Bacon Jalapeño Bites

For the presentation of this treat I cut out a round piece of cheese that fit perfectly over the tortilla chip. Had I not been photographing this I would have just gone with a square piece of cheese.

I placed a small ramekin on a slice of cheddar and traced around it with a knife. I was able to get only one round piece out of each square slice, so I had a lot of scrapes of cheese left over when I was done. (Me and my dog snacked on them while I took the pictures.)

More and more I find myself doing things to the food for the sake of a good photograph that I wouldn't normally do. Everything is still edible though, I haven’t resorted to half-cooked pasta or near raw steaks with sear marks from curling irons yet. Although, I would consider it for the right amount of money!

Eat well, cook often ...

THE RECIPE
Creamy Bacon Jalapeño Bites

Make 20 to 24 snacks; 1 hour
8 slices Bacon diced
1 pkg Cream cheese (8 oz)
1 C Sour cream
1/2 C Jalapeño pepper
seeded, diced
20 to 24 tortilla chips round
1 lb Cheddar Cheese cut into 20 to 24 sliced
1/4 C Chives, diced

Cook bacon
In a fry pan over medium heat cook bacon until rendered and crisp, 8 to 10 minutes. Remove to a paper towel lined plate and let cool.

Make spread
In a large bowl mix together cream cheese, sour cream, bacon and jalapeño until well incorporated. Adjust seasoning if necessary. Cover and let flavors meld for at least 30 minutes.

Build appetizer

On a tortilla chip layer piece of cheese, spread and garnish with chives, then serve.

Bacon Chipotle Chicken Salad


Printable version
I used to eat chicken salad from a number delis when I lived in New York City. It was a reasonably inexpensive lunch item in a city were everything was expensive. The chicken was always fresh, never canned, which made for a much tastier salad and there was always a gourmet twist depending on which place you got it.

Chicken salad is really basic and it only takes an element or two to turn it into a unique delicious bite.

For this recipe, I used grilled chicken with chipotle and bacon to make a southwestern chicken salad pita. The basic elements of mayonnaise, celery, lemon juice and chicken make for a refreshing sandwich on their own. I enhance the flavors with the edition of bacon, chipotle and fresh tarragon. Any number of ingredients could have taken their place. The key is finding complimentary flavors that work together and adding them to the basic recipe. It’s a great way to enhance a classic, and for me, chicken salad always reminds me of lunches in Central Park.

BEHIND THIS BITE
Years ago, my Mom was visiting me in New York and made a batch of chicken salad from leftover chicken that I had grilled the night before. It tasted so good that I have preferred to make it with grilled chicken ever since. I won’t wait for left over chicken anymore though, I grill up a batch specifically for chicken salads.

I made this as part of a spread for a gathering of 15. It was served with mini bagels for sandwiches. As snack time was winding down I noticed a couple of guys eating it on tortilla chips, I decided to give it a try and I was amazed. I thought it would be good in a soft taco, but after trying the tortilla chips I think this would be great in a crunchy taco with a little lettuce and cheese.

Which ever way it’s eaten it doesn’t matter though, this is a tasty chicken salad that will make for a delicious lunch with or without bread, tortillas or bagels.

Eat well, cook often ...

THE RECIPE
Serves 6; 10 minutes active,
30 minutes resting

3 C Grilled chicken, diced
1 C Mayonnaise
1/2 C Celery diced
8 strips Bacon, cooked, crumbled
1/4 C Chipotle chiles in adobo, seeded, minced
1 Tbs Tarragon, minced
Juice of 1 Lemon
6 to 8 Pitas
Lettuce for garnish

Make chicken salad
In a large bowl mix together, chicken, mayonnaise, celery, bacon, chipotle, tarragon and lemon juice. Place in refrigerator for 30 minutes to allow flavors to meld.

Assemble sandwiches

Place a spoonful of chicken salad in a pita, garnish with lettuce, then serve.

French Onion with Bacon Dip


Printable version
To me, chip dip screams summertime. It seems like whenever I’m scooping a mouthful onto a wavy potato chip I’m either at a lake for a picnic or an outdoor party in the heat of summer. The one exception is Super Bowl Sunday, but that is the pinnacle of party food and dips are a requirement.

For this recipe, I decided to revisit a classic that I had made a couple of years ago for my print column - French Onion Dip, only this time I add bacon.

The secret to making this dip delicious is not the onions or the bacon – it’s the roasted garlic, which provides a savory balance to the sweetness of the caramelized onions and gives the dip depth of flavor.

I tried something I have never done before to cook the garlic for this dish. Instead of roasting it in the oven, I wrapped it in foil with a little olive oil, salt and pepper and tossed it into the pot with the onions. After a half an hour it was perfectly roasted and ready for me to mince and put in the dip. The foil worked perfect as a little garlic roaster.

In the end, this dip was outrageously good.
The homemade version just blows any store-bought french onion dip out of the water. It will be a highlight in any spread at a party.

BEHIND THIS BITE
As I mention in the beginning, it has been a couple of years since I have made homemade chip dip and I had forgotten how delicious it is. I destroyed about a half a bag of chips after I made this stuff and had to force myself to put it away.

It seems like over the last few weeks I had been putting together some huge posts with tons of pictures and steps. This dip was a conscious effort to make something simple that wouldn’t take hours to photograph and reproduce in an information graphic. I had done a couple of tacos (here & here) recently that contain as many photos and steps as I usually do in two or three posts. I wanted a simple recipe that would come together quick.

If you’re a fan of dips I highly recommend trying this, but make sure there is enough chips around because it’s pretty easy to polish off an entire bag with a bowl of it on the counter.

Eat well, cook often ...

THE RECIPE
Makes 2 Cups; 1 hour
4 strips Bacon, diced
5 cloves Garlic, whole
1 1/2 C Onion, diced
1 C Sour cream
1/2 C Mayonnaise
1 bag Wavy potato chips

Fry bacon
In a pan over medium heat cook bacon until crispy and rendered, 6 to 8 minutes. Remove from pan with slotted spoon to a paper towel lined plate.

Caramelize onions, roast garlic

In same pan over medium heat saute onions in bacon drippings. Season garlic with olive oil, salt and pepper to taste. Wrap cloves in aluminum foil. Add foil wrapped garlic to onions. Cook until onion are soft and have caramelized 25 to 30 minutes, stirring occasionally. Remove onions from pan and let cool. Remove garlic from foil and mince.

Make dip

Mix together bacon, onions, garlic, mayonnaise and sour cream until well incorporated. Adjust seasoning if necessary. Let rest at least half an hour for flavors to meld. Serve with wavy potato chips for dipping.

Ranch Coleslaw Bacon Dogs


Printable version
Hot Dogs are a summertime staple. I couldn’t imagine going an entire summer without having at least one at either a family gathering or a cookout. I think they’re as American as apple pie. I will eat a hot dog with just ketchup and mustard, but I love to dress them up with everything from chili to lettuce and tomato.

For this recipe, I adorn my hot dogs with one of my favorite flavor combos of all-time - bacon and ranch. The creamy coleslaw is really a vehicle for the ranch flavor in this and acts as a relish and condiment all-in-one. When I assemble it I place a full strip of bacon right beside the dog before topping with the slaw.

The two combine to give this summer classic a great flavor that will have you going back for seconds and possibly thirds.

BEHIND THIS BITE
I recently put together a hot dog bar for a church gathering that included chili, cheese, sauerkraut and a few other toppings usually found on hot dogs. This inspired me to create a couple of new ones here at the blog.

The hot dog bar that I made for the church was put together with all store-bought items for convenience and cost effectiveness. I couldn’t believe how well it went over. I was worried that people would be turned off by the dogs and their reputation for being unhealthy, but to my surprise they were a huge hit and everyone was able to make a dog the way they wanted it to be.

I hope that I get the opportunity one day to go all out and cater an event that requires a gourmet hot dog bar. It would be a fun way to feed a crowd, and a great way to come up with some outstanding new dogs to gobble down for those mid-summer cookouts.

Eat well, cook often ...

THE RECIPE
Makes 8 dogs; 20 minutes active; 50 minutes total
3 C Coleslaw mix
1/3 C Mayo
1 Tbs Vinegar
1 Tbs Sugar
1 Tbs Vegetable oil
1 1/2 Tbs Ranch seasoning mix
8 strips Bacon
8 hot dogs
8 hot dog buns

Make slaw
In a bowl mix together cabbage, mayo, vinegar, vegetable oil, sugar and ranch seasoning. Refrigerate and let sit for at least half an hour.

Cook bacon, dogs
On a broiler pan in a preheated 425° oven, cook the bacon until crisp, 15 minutes. On a prepared grill cook hot dogs until cooked through, turning periodically. 6 to 8 minutes.

Assemble dogs

Place a dog and strip of bacon in a hot dog bun and top with coleslaw, then serve.

Smoky and Sweet Brussel Sprouts


Printable version
I took the easy route with these brussel sprouts. Bacon, sautéd onion and a little garlic can make about anything taste good. As the wild card, I threw in a little white wine just for some added pop. I needed these brussel sprouts to burst with flavor. It was the least I could do after a surreal experience the day before.

My Mom cooked up a batch for a family get together. I saw the bowl and suddenly I was overcome by the urge to snatch one up and gobble it down. After I popped it in my mouth like a humongous tic tac, something happened that I have never experienced. The brussel sprout had absolutely no flavor.

Blank.

Not even a slightest hint of taste.

It was like chewing water! I called out in horror “Where is the flavor!” My Mom and sister came running into the kitchen concerned for my well being. Mom answered “I know, I think I cooked them to long.” I then cried out. “Cooking is not the problem! They have no flavor!”

What had I done deserve this? Had I lost the ability discern flavor? I would rather it taste bad than have no flavor at all. How was I supposed to react?

I had nothing to say.

No opinion, critique or comment.

I had entered the the food blogger's Twilight Zone.

It took three Cadbury eggs, a bag of peanut M&Ms, and two trays of peeps leftover from Easter to calm my nerves. I made it my mission the next afternoon to cook up a mess of brussel sprouts loaded with flavor, just to try and erase the trauma of Mom’s tasteless batch.

I have no idea what Mom did or didn't do to those brussel sprouts, or weather they were picked to soon or to late, but they tasted no different than the water they were cooked in! The mess I created for this post has helped put the episode behind me.

BEHIND THIS BITE
I can’t ever remember eating something and not tasting anything, unless I was in the throws of a raging head cold where all flavor and smell is gone from everything I consumed. It’s weird that it happened with brussel sprouts.

I bet there are thousands of kids out there that wished the brussel sprouts they were being forced to eat had no flavor. I have often wondered why kids hate them so much. I really don’t think it’s a flavor issue as much as it is an appearance issue. Most people steam or boil them, and too much cooking time makes their appearance go south in a hurry. Overcooked brussel sprouts look like a glob of goo on a plate. I don’t know anyone who thinks a glob of goo is appetizing - except for maybe Jabba the Hutt.

Eat well, cook often ...

THE RECIPE
Side for 4 to 6; 25 minutes
1 C Onion sliced
1 tsp Garlic minced
3 Tbs White wine
1 lb Brussel sprouts, halved
1/3 C Bacon, cooked, crumbled

Sauté vegetables, reduce wine
In a sauté pan over medium heat cook onion in a little olive oil until soft, 5 to 6 minutes. Salt and pepper to taste. Add garlic and cook 2 minutes more. Add white wine, increase heat and simmer until wine evaporates, 3 to 4 minutes.

Add brussel sprout, bacon, finish
Stir in brussel sprouts and bacon, turn heat to low and cover, let cook 10 to 12 minutes stirring occasionally, adjust seasoning if needed. Once brussel sprouts are cooked through and slightly crunchy remove from heat and serve.

Bacon Aioli


My last post was of a basic garlic aioli from Cook’s Illustrated. It was the first step in recreating a bacon aioli I had tried with french fries at Box Frites, a concessions stand at Citifield, home of the New York Mets. I wasn't hoping to recreate the sauce exactly, really, I just wanted to make a good bacon sauce.

I thought that it would be easy to change out a few ingredients and make the aioli from Cook's Illustrated in a completely different way.

WRONG.

My changes to the recipe were to eliminate the garlic then add bacon and some of the drippings. I first tried making it by throwing everything in the processor at once. The drippings screwed with the science of the aioli and the oil never emulsified. That meant the first batch went into the garbage.

During the second attempt, I emulsified everything into an aioli, then added the bacon and drippings. So I basically made the aioli from the original recipe without the garlic. This was alright except that I used an olive oil that I don’t usually use because I ran out of my Felippo Berio brand. The less than stellar flavor of the oil and the missing garlic were noticeable. The overall batch wasn’t bad, but it wasn't great either.

That’s when I realized I needed to make the aioli according to the directions of Cook’s Illustrated, like I had originally, with good olive oil and mix in the bacon and drippings after the it was processed.

If it ain’t broke then don’t fix it!

I was hoping to invent a new sauce, but in the end I took a really good recipe from a trusted source and added bacon. I won’t use this for my print column or in a book of original recipes but it did make for a tasty sauce to dip some fries in.

Eat well, cook often ...

THE RECIPE
Makes 3/4 cup; 5 minutes
2 Egg yolks
4 tsp Lemon juice
1 tsp Garlic, finely minced
1/8 tsp sugar
3/4 C Olive oil
4 strips Bacon diced
2 Tbs Bacon drippings reserved

Make aioli in processor
Place yolks, lemon juice, sugar, garlic, salt and pepper to taste in a food processor. Pulse to combine ingredients. Turn processor on and slowly drizzle oil in. Once all the oil has been incorporated and aioli forms stop processor and scrap down sides.

Add Bacon
In a pan over medium heat cook bacon until crisp. Remove to a paper towel-lined plate. Reserve two tablespoons of drippings from pan and let cool slightly. Add bacon and drippings to processor and pulse until combined with aioloi. Remove to a bowl for serving.

Jalapeño Popper Pizza


Printable version
Jalapeño poppers got their name from the marketing of the frozen snacks. The term “Popper” has been used for the last 30 years to market a variety of treats and appetizers, not just the cheese stuffed chiles though.

There are many who believe the jalapeño popper is an American adaptation of chili rellenos. Whether this is true can not really be proven, but the two are strikingly similar. Reports have surfaced that cheese stuffed breaded jalapeños were being served around the San Diego area as far back as the 1960s. But an exact origin of the popper is hard to pinpoint.

There is one thing about the popper I know for sure – I love them! They have to be one of my favorite snacks of all-time. I made my own version a while back here at Behind the Bites in which I transformed the ingredients to suit my preferences. It's my own take on the popper, but whatever the version I think it's hard to go wrong with the combination of cheese, bacon and jalapeños.

For this recipe, I take all those great flavors and distribute them on a pizza. The cream and cheddar cheeses, bacon and jalapeño help this pie burst with flavor. This is a must try for pizza or popper lovers alike - it's also a great way to ease the younger ones into more spicy foods.

BEHIND THIS BITE
I use a lot of pre-made pizza crusts to make pizza. I always keep a package in my pantry. It makes pizza a 30-minute meal or a quick lunch. I use Momma Mary’s Thin and Crispy crusts exclusively.

I think they are the best, but many pre-made pizza crusts just plain suck. I would name a few but I’m not here to bash, I will only endorse Momma Mary’s. Their thin crusts are like a soft buttery cracker delivering the toppings. When canned dough is not an option or there is not enough time and energy to make dough from scratch, the Momma can be trusted.

Like I said, I always keep a package in the pantry, and NO I’m not getting paid by Momma Mary’s to write this. I recently had some horrifically bad pre-made pizza crust and it made me appreciate the quality of their product – so I thought I would give them a shout. But, if an employee of Momma Mary's does reads this, I encourage you to tell your boss and consider sending me a case ... the Thin and Crispy style.

Eat well, cook often ...

THE RECIPE
Make 2 12” pizzas; 30 minutes
Divide over 2 12” pizza crusts
8 oz Cream cheese
6 Jalapeños, sliced
1/2 C Bacon, crumbled
1 C Cheddar cheese, shredded

Assemble and bake pizza
On pizza crust layer cream cheese, jalapeño, bacon, and cheddar cheese. Bake in a preheated 425° oven for 7 to 10 minutes or until cheese is melted and bubbly.